
What we're going to build in this post:
- Azure web job, which is triggered by a queue message from a custom site template (previously known as site design). The job uses PnP Framework to provision a new site based on the PnP template.
- MS Teams bot, which pushes notifications to the configured channel about the provisioning state.
As usual, for such "code-behind posts", the sources are available under GitHub here.
High-level overview
This is how the approximate solution looks like:
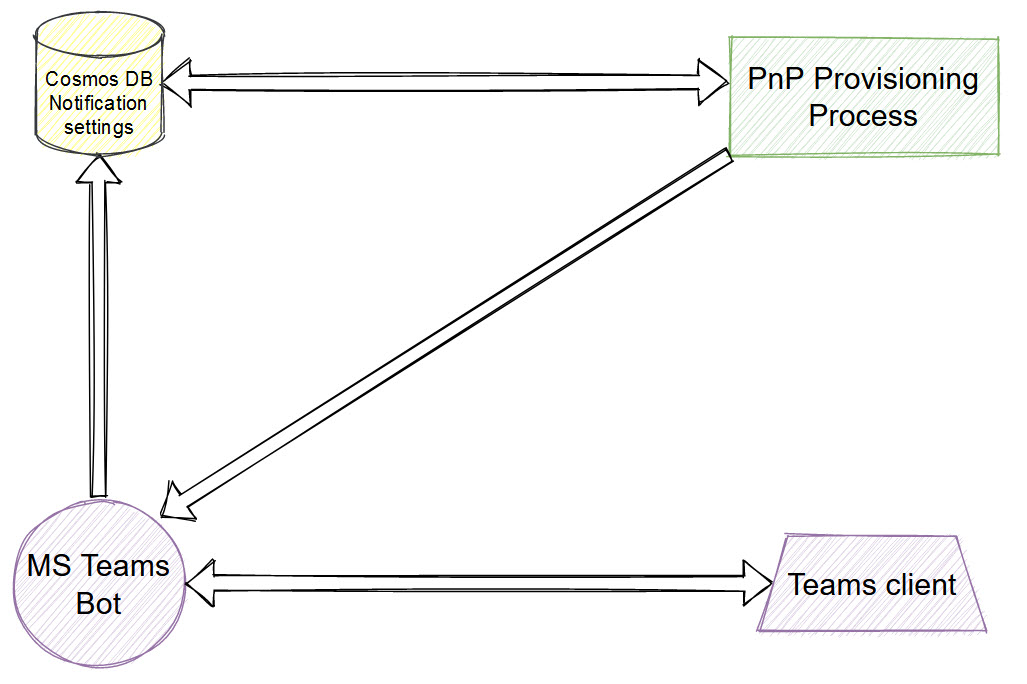
Cosmos database contains notification settings. It includes channel id (the channel, which receives notifications about provisioning state), service URL (we use this URL to send proactive messages to, can be obtained from bot activity), and tenant id (optional). PnP provisioning reads the database and proactively pushes notifications using bot credentials to all configured channels.
The bot acts as a configuration manager and notifier. You can use it to enable or disable notifications for a specific channel.
A tech used here:
- the bot is backed with .NET 5 web app, hosted on azure
- Azure web job for provisioning (azure functions can be used as well), .NET 5 based
- Cosmos DB to store settings
- PnP Framework for provisioning
The Bot
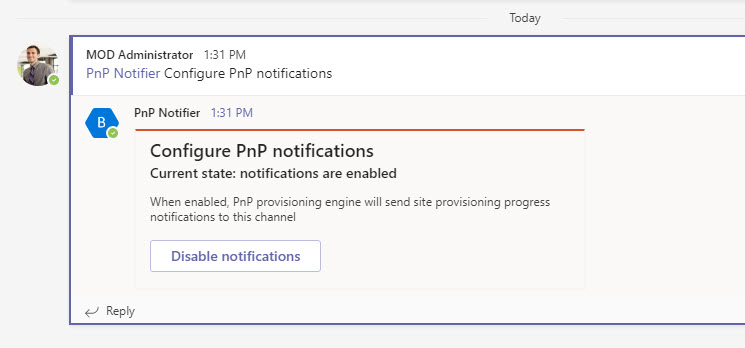
The bot contains one command "Configure PnP Notifications". In the response of the command it sends a card with an option to either enable or disable configuration for the current channel:
By clicking the button a new entry will be added (or removed) in the Cosmos database. It doesn't make sense to use a user or conversation state, because the data stored is not related to a user or conversation. Thus Microsoft.Bot.Builder.IStorage is used to write directly to the database.
This is a code sample from bot, which handles message events:
protected override async Task OnMessageActivityAsync(ITurnContext<IMessageActivity> turnContext, CancellationToken cancellationToken)
{
	var command = turnContext.Activity.RemoveRecipientMention();
	var value = turnContext.Activity.Value as JObject;

	if (value == null || value[nameof(CardPayload.CardActionType)] == null)
	{
		await OnCommandAsync(command, turnContext, cancellationToken);
	}
	else
	{
		var payload = value.ToObject<CardPayload>();
		await OnCardActionAsync(payload, turnContext, cancellationToken);
	}
}
In short, we check whether the message is a command or a result of a card action. Depending on the outcome, we execute the different flows.
Below is a code sample, which checks whether notifications are enabled for the current channel or not (uses Microsoft.Bot.Builder.IStorage):
public async Task<bool> IsNotificationsEnabledAsync(string channelId)
{
	var notifications = await _storage.ReadAsync<NotificationStorageModel>(Consts.StorageNotificationsKey);
	if (notifications == null)
	{
		return false;
	}

	return notifications.NotificationsData.Any(n => n.ChannelId.Equals(channelId, StringComparison.OrdinalIgnoreCase));
}
The bot also is used to send proactive messages to the configured channels. The messages are sent from the provisioning job.
PnP provisioning job
The job is triggered by a custom site template. So we need to apply a custom site template :

After you click Apply, the provisioning will be triggered by a new queue message, coming from the Azure Logic app or Power Automate flow, which, in turn, will be executed from a custom site template.
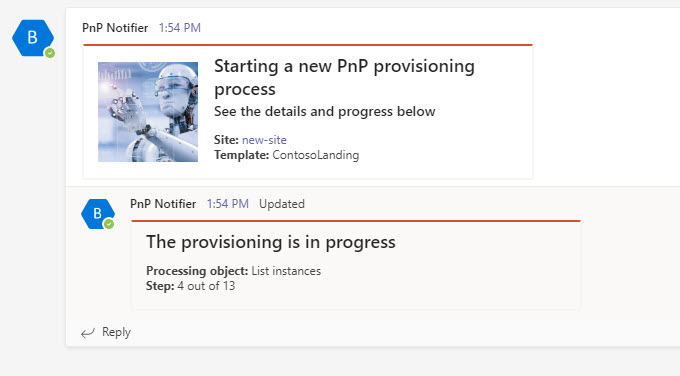
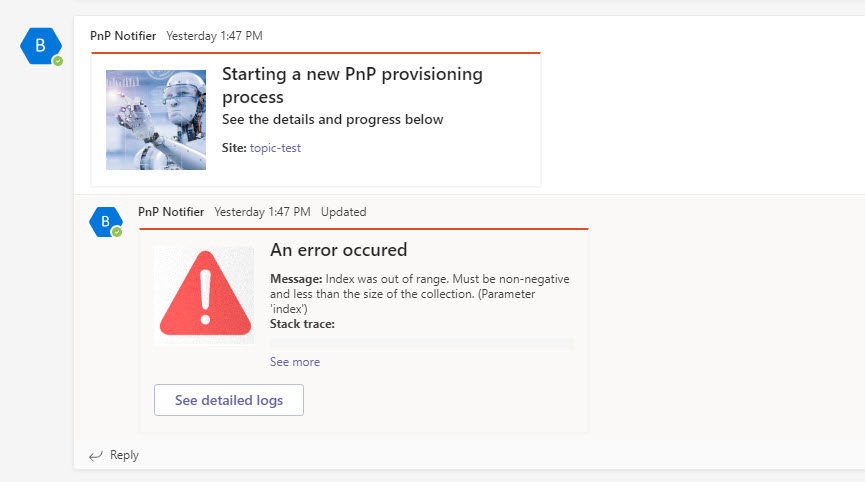
After a while, the bot will push update notifications about the progress:
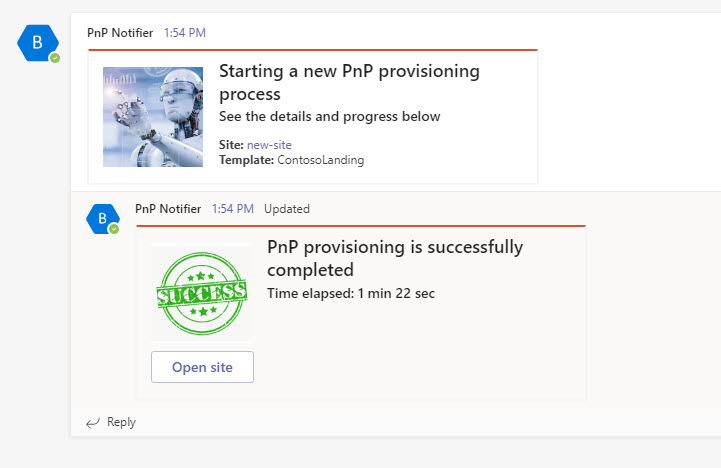
And then success card if the provision is OK:
Or an error card if something went wrong:
The provisioning hosting environment is a web job. You can use Azure Functions as well, however, remember about the maximum run time for functions (or use orchestration). The job uses PnP.Framework to provision Contoso Landing site template from here. The code for provisioning is exactly the same as it was before for PnP.SitesCore:
private void Provision(Web web, ProvisioningTemplateApplyingInformation applyInfo)
{
	var fileConnector = new FileSystemConnector(_hostingEnvironment.ContentRootPath, string.Empty);
	var provider = new XMLOpenXMLTemplateProvider(_templateName, fileConnector);

	var template = provider.GetTemplates().ToList().First();
	template.Connector = provider.Connector;

	web.ApplyProvisioningTemplate(template, applyInfo);
}
Below is a code sample used to push notifications (called proactive messaging) from the provisioning process to teams client with help of the bot:
foreach (var data in _notificationData)
{
	try
	{
		var client = new ConnectorClient(new Uri(data.ServiceUrl), GetMicrosoftAppCredentials(), new HttpClient());
		var conversationParams = new ConversationParameters
		{
			IsGroup = true,
			ChannelData = new TeamsChannelData
			{
				Channel = new ChannelInfo(data.ChannelId),
			},
			Bot = new ChannelAccount
			{
				Id = _botCredentials.MicrosoftAppId
			},
			TenantId = _azureCreds.TenantId,
			Activity = (Activity)MessageFactory.Attachment(thumbnailCard.ToAttachment())
		};
		var conversationId = _conversationMap[data.ChannelId];
		var replyToId = _activityMap[data.ChannelId];
		await client.Conversations.UpdateActivityAsync(conversationId, replyToId, conversationParams.Activity);
	}
	catch (Exception ex)
	{
		_logger.LogError(new EventId(), ex, ex.Message);
	}
}
This is how it works - PnP does the job and sends update progress through the ProvisioningTemplateApplyingInformation. The code uses proactive messaging, bot credentials, and configuration data from CosmosDB to notify the IT department about ongoing deployment and the progress.
How to run sample locally
To run it locally, you need a few things:
- Azure storage emulator and Azure storage explorer
- Azure CosmosDB emulator
- ngrok service
Run ngork service
Execute
ngrok http 3978 --host-header=localhost
It starts a new process. Save the ngrok URL.
Add a new bot channel registration
Don't forget to add MS Teams under Channels settings. Also, add Client Secret and save Secret (Microsoft App Password) and Microsoft App ID. Under Configuration -> Messaging endpoint add your ngrok URL with api/messages, i.e. https://dbbbbc9b8cce.ngrok.io/api/messages.
Update dev manifest
In visual studio go to PnPNotifier.Bot/manifest/dev/manfiest.json and update
- botId - should be your Microsoft App Id from bot registration
- validDomains - add your ngork server host
- developer - change URLs here as well
Add user secrets
Right-click on the Bot project and select Manage User Secrets. Add below JSON (use values saved before):
{
  "BotCredentials": {
    "MicrosoftAppId": "<app id>",
    "MicrosoftAppPassword": "<password>"
  }
}
Do the same for the job project as well.
Update ComsoDB configuration
Run CosmsoDB emulator and update AuthKey in appsettings.Development.json. AuthKey can be found in Emulator's Data Explorer. Do the same for the Job project as well.
Create a new database called "PnPBotData" using Data Explorer.
Create Azure AD app for PnP Authentication
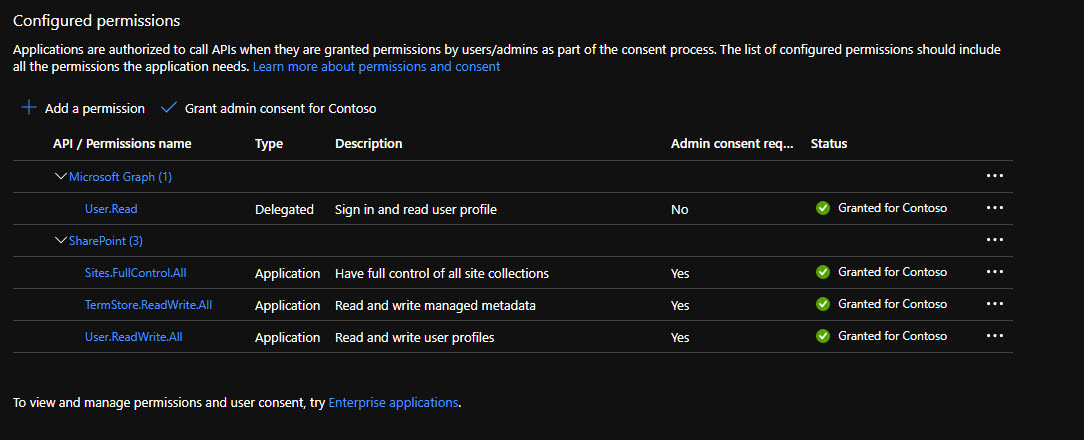
Now you should register an Azure AD, which will be used by PnP code to perform authentication. Since we use provisioning, we need application permissions and certificate-based authentication.
Thus add a new App Registration in your M365 Active Directory, add SharePoint application permissions:
You should also upload a certificate for authentication. How to obtain this certificate? You can either use
- PowerShell to generate a self-signed certificate and update key creds in azure app registration. Follow steps 4-8 from this blog post.
- or use Azure Key Vault to generate a certificate and upload it to the App Registration
Ideally, the solution should use Azure Key Vault for all secret management, however, I wanted to make it more clear for readers, thus all settings are in JSON configuration file.
From the app registration, we need ClientId, TenantId, and a file called cert.pfx, which is a private key. Add it to Visual Studio and set Copy If newer. Under Job project update corresponding AzureAdApp properties in appsettings.Development.json file.
Run it
Hit F5 and VS will run the web app with the Bot and console app with the Job. Open ngrok URL to check that it works.
Add bot and test it
Under PnPNotifier.Bot/bin/Debug/net5.0 find a file package-dev.zip and upload it to the MS Teams client. Now add the bot to any team and execute the command by mentioning the bot and selecting "Configure PnP notifications". You should see a card with the current status of the channel (whether notifications are enabled or not):
If you want to test the provisioning process, go to Azure Storage Explorer and under local storage service add a new queue called "pnp-provision". Add a new message to the queue in the format:
{
    "WebUrl": "https://<your org>.sharepoint.com/sites/my-site"
}
This should trigger your job.
How to deploy
For production deployment, you should implement the below steps:
- Add a new Bot Channel Registration in Azure
- Create a new App Service to host your bot and web job.
- Deploy bot project and web job to the newly created App Service.
- Create a new CosmosDB service and PnPBotData database. Save connection information.
- Create a new storage account and add a queue called "pnp-provision". Save connection information.
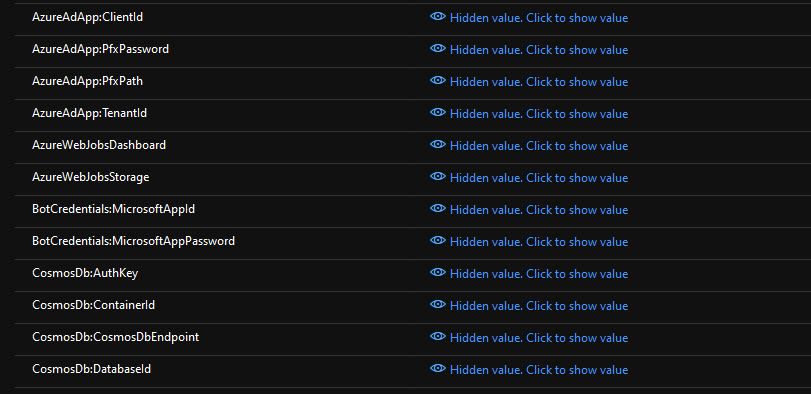
- Update App Service app settings. You need the following values (since in configuration these settings are inside sections, you should semicolon pattern in App Service). For simplicity, I use App Service config, but it's better to use Azure KeyVault to store configuration settings.
-
- Update PnPNotifier.Bot/manifest/prod/manifest.json with appropriate values - botId, validDomains, developer URLs, and rebuild the project.
- Upload package-prod.zip from bin/Release/net5.0 to the MS Teams client.
- Configure a new site template and a flow, which pushes a new entry to a queue. You can use steps from here. The format of the message should a JSON as indicated above.
- Test your bot.
Once again, the source code is available at GitHub here.
Final thoughts
A bot is not the only way of sending notifications to channels. You can also use incoming webhooks or connectors. However, a bot is the most flexible and extendable solution.
That's an example of how you can use bots with your IT department procedures. You can further extend this bot to add new features like IT requests, status tracking, etc. You can also add more features related to the PnP framework and governance as well. This bot can be a good starting point.
Title image credits - Man vector created by vectorjuice - www.freepik.com