
The problem
You have a custom SharePoint Site Design, which executes (through MS Flow or Azure Logic App) PnP Provisioning process. You want to notify users that the site is not fully ready yet and it's still being updated (by background provisioning, which might take a long time). One option is to use two-way interactive communication between the SharePoint web site and the job using SignalR. That's something we're going to explore in this post in great detail.
Check out below short video, which demonstrates the resulting UX we're building in this post:
The video was cut because the actual process takes 7-9 minutes on my tenant.
Read further below to find out how to setup everything from scratch.
All sources, as well as brief configuration steps, are available at the GitHub repository.
High-level schema how it works

- An admin creates a new site collection using custom site design. The site design triggers an HTTP POST request to the Azure Logic app.
- The Logic app puts a new message into the Azure queue.
- The message in the queue triggers the PnP Provisioning WebJob. The site design also adds an application customizer, which interactively displays the current progress. After the provisioning, the web job deactivates the application customizer.
- The WebJob adds new artifacts to the SharePoint site and pushes progress updates to the SignalR server.
- The SignalR server notifies the newly created web site about the current operation through the Application customizer.
FAQs:
Why Azure WebJob and not Azure Function?
- The whole solution makes sense only for the long-running provisioning process. For big schemas, it might take more than 30 minutes. Azure Functions have a limit of 10 minutes. Of course, you can orchestrate them using smaller chunks, but that means you will have to split your schema, which is inconvenient and adds complexity to the solution.
Why Azure Logic app and not MS Flow Power Automate?
- MS Flow Power Automate HTTP trigger now is a premium connector. We can use the Azure Logic app for the same purpose, which will be a lot cheaper. "Trigger Flow" site script action works well with Logic Apps built-in HTTP triggers.
The implementation
We need below things to be configured \ created:
- Azure Storage account to handle Queue messages, store PnP Provisioning schema template and files
- Azure Logic app
- Azure AD app registration to handle authentication between all parties (WebJob to SharePoint and SignalR server, Application customizer to SignalR server)
- SignalR hub - ASP.NET Core solution
- Azure WebJob solution
- SharePoint Framework Application customizer which connects to SignalR hub and displays the progress
- Site script and site design
Let's work on them one by one.
Azure Storage account
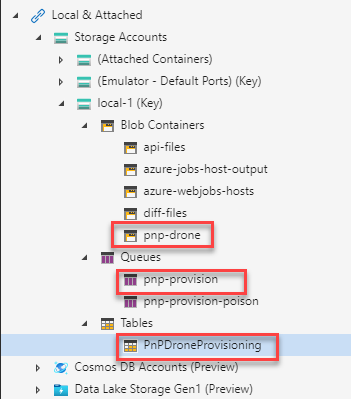
Create a new storage account in your Azure subscription. Now we need a few things to be added into the storage account:
Blob
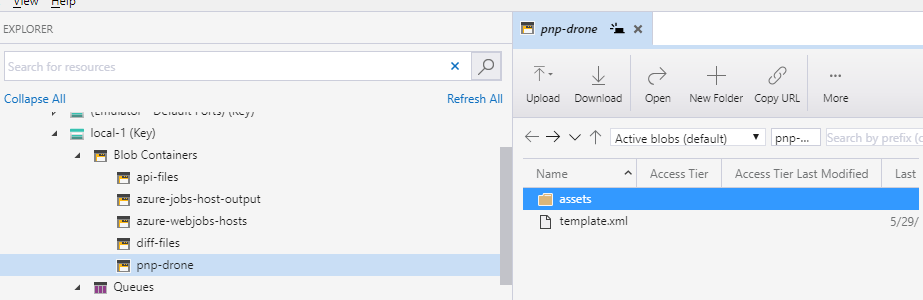
For PnP Provisioning I use the Contoso Drone Landing template. template.xml file and assets folder are both stored inside a blob called "pnp-drone". Let's go ahead and create a new blob and all required files (you can download them from GitHub's link above). You can use Azure Storage Explorer to upload folders to Azure blobs. Here is how resulting blob looks like in Azure Storage Explorer:
Queue
We need an Azure Queue to trigger the provisioning process. Let's create a queue "pnp-provision".
Table
We also need a table to store a current operation (for example "Operation: Provisioning List Instances"). The application customizer will later use the current operation state to display initial UI (instead of waiting for the next event from SignalR hub). I gave the table name "PnPDroneProvisioning".
Here the resulting items in the storage account:
Azure Logic App
Go to the Azure portal and create a new empty Logic App. Go to the designer and add "When a HTTP request is received" as a trigger for your app.
As "Request Body JSON Schema" use below JSON:
{
    "properties": {
        "createdTimeUTC": {
            "type": "string"
        },
        "creatorEmail": {
            "type": "string"
        },
        "creatorName": {
            "type": "string"
        },
        "parameters": {
            "properties": {
                "event": {
                    "type": "string"
                },
                "product": {
                    "type": "string"
                }
            },
            "type": "object"
        },
        "webDescription": {
            "type": "string"
        },
        "webUrl": {
            "type": "string"
        }
    },
    "type": "object"
}
As the next step in the app add "Put a message on a queue". We should put a new JSON message into the Azure queue. The format of JSON is:
{ "webUrl": "<full new SharePoint site url" }
For webUrl parameter, we can use the webUrl extracted on the trigger step. So our resulting app looks like on the image:

Take a note on a Queue Name - the one created before.
Save HTTP POST url from the trigger step, we need it in our next steps.
Azure AD app registration
Create a new app registration in your Azure AD tenant using the Azure portal. Give at a name (mine called "SPFx SignalR Hub"). The app registration is very important here because we're going to use it for all types of authentication in the solution.
Update the settings:
- Under "API Permissions" add permissions for SharePoint - Sites.FullControl.All, User.ReadWrite.All.
- Under "API Permissions" click "Grant admin consent for <organization>"
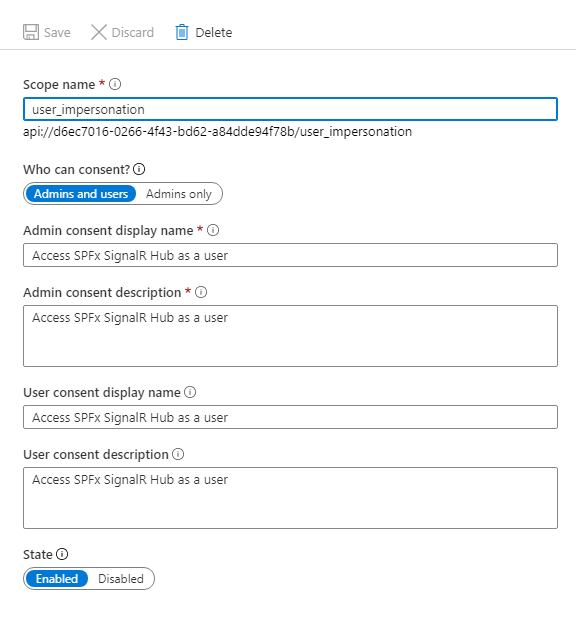
- Under "Expose API" add a new scope called user_impersonation (accept api://<client id> as App ID URI if asked):
- In order to authenticate from WebJob to SharePoint, I use certificate-based Azure AD authentication (otherwise you might receive "Unsupported app-only token" error when trying to use REST API). We need a new certificate to sign our tokens. Fortunately, you can easily generate one using PowerShell:
-
$cert = New-SelfSignedCertificate -Subject "CN=SPFxSignalR" -CertStoreLocation "Cert:\CurrentUser\My"  -KeyExportPolicy Exportable -KeySpec Signature -NotAfter (Get-Date).AddYears(3)

 $bin = $cert.RawData
 $base64Value = [System.Convert]::ToBase64String($bin)
 $bin = $cert.GetCertHash()
 $base64Thumbprint = [System.Convert]::ToBase64String($bin)
 $keyid = [System.Guid]::NewGuid().ToString()
 $jsonObj = @{customKeyIdentifier=$base64Thumbprint;keyId=$keyid;    type="AsymmetricX509Cert";usage="Verify";value=$base64Value}
 $keyCredentials=ConvertTo-Json @($jsonObj) | Out-File "keyCredentials.txt"
-
HINT: You can use an Azure Keyvault instance to generate the certificate. Read about this great suggestion in comments by Nathan.
- This command will create a file called keyCredentials.txt. Go to Azure App Registration, then select Manifest and copy the content of keyCredentials.txt to keyCredentials node.
- From your windows machine open Certificates snap-in, export private certificate SPFxSignalR from Personal certificates and add it into the solution (select "Copy always" in Visual Studio, so that this file will be available under your bin output). You should protect the certificate with a password. The name of the certificate is cert.pfx.
- Under "Certificates & secrets" in Azure portal generate a new Client Secret.
- Take a note on your App display name, App (Client) ID, Client Secret.
At this point, we configured our Azure AD app. We will use it later for authentication in the SignalR web app and from the application customizer.
If you want, you can use SharePoint App registration for authentication between WebJob and SharePoint, which might be easier in configuration. For that purpose, you should create a new SharePoint app registration using AppRegNew.aspx and add tenant permissions using AppInv.aspx pages.
SignalR hub
I won't dig into every single line of code, I will rather provide high-level architecture overview with some code highlights. The full sources are here at GitHub. The readme file contains detailed steps on how to configure the solution to run it.
We have two SignalR clients - SharePoint web site with application customizer and Azure WebJob. SignalR hub is a web app exposed to the internet, we can't leave it unprotected (i.e. without authentication). That's why you should add Azure AD JWT Bearer authentication to your SignalR web app solution using below code:
spoiler (click to show)
public void ConfigureServices(IServiceCollection services)
{
	IdentityModelEventSource.ShowPII = true;
	Settings.StorageConnection = Configuration[Consts.AzureDashboardKey];
	var tenantId = Configuration["AzureAd:TenantId"];

	// use Azure AD JWT Bearer authentication by default
	services.AddAuthentication(AzureADDefaults.JwtBearerAuthenticationScheme)
		.AddAzureADBearer(options => { Configuration.Bind("AzureAd", options); });

	services.Configure<JwtBearerOptions>(AzureADDefaults.JwtBearerAuthenticationScheme, options =>
	{
		options.Authority += "/v2.0";

		options.TokenValidationParameters.ValidAudiences = new []
		{
			options.Audience, $"api://{options.Audience}"
		};

		options.TokenValidationParameters.IssuerValidator = (issuer, token, parameters) =>
		{
			if (!issuer.Contains(tenantId))
			{
				throw new SecurityTokenInvalidIssuerException("Issuer received doesn't match Tenant id");
			}

			return issuer;
		};

		options.Events = new JwtBearerEvents
		{
			OnMessageReceived = AttachAccessToken
		};

	});

	services.AddSignalR();
	services.AddMvc().SetCompatibilityVersion(CompatibilityVersion.Version_2_2);
}

// web sockets don't transport headers, so an access token is attached throught the query string
// this method reads token from the query string and adds to the context, so that request becomes authenticated
private static Task AttachAccessToken(MessageReceivedContext context)
{
	var accessToken = context.Request.Query["access_token"];

	if (!string.IsNullOrEmpty(accessToken))
	{
		context.Token = context.Request.Query["access_token"];
	}

	return Task.CompletedTask;
}
And this is the hub itself (take a not on Authorize attribute):
spoiler (click to show)
[Authorize]
public class PnPProvisioningHub : Hub
{
	private readonly ILogger _logger;

	public PnPProvisioningHub()
	{
		_logger = NLog.Web.NLogBuilder.ConfigureNLog("nlog.config").GetCurrentClassLogger();
	}

	// notifies all connected clients about progress change
	public Task Notify(object data)
	{
		return Clients.All.SendAsync("notify", data);
	}

	// notifies all connected clients that the provisioning is completed
	public Task Completed()
	{
		return Clients.All.SendAsync("completed");
	}

	// notifies specific client about the current state of the provisioning process
	public void InitialState(string webUrl)
	{
		try
		{
			var rowKey = webUrl.Split('/').Last();

			var tableManager = new TableManager(Consts.TableName, Settings.StorageConnection);
			var state = tableManager.GetByKey<ProvisioningState>(rowKey);

			if (state == null)
			{
				Clients.Client(Context.ConnectionId).SendAsync("initial-state", new
				{
					Total = -1
				});
				return;
			}

			Clients.Client(Context.ConnectionId).SendAsync("initial-state", new
			{
				state.Message,
				state.Progress,
				state.Total
			});
		}
		catch (Exception e)
		{
			_logger.Error(e);
			throw;
		}
	}
}
The Hub has only three methods:
- Notify - to send an update to all connected clients about the current operation
- Completed - to indicated that the provisioning process is fully finished and a user can refresh the page to see changes
- InitialState - to send the response to the connected client with the current state of the provisioning
The application customizer connects to the Hub and gets current status by executing InitialState, then it simply listens to Notify and Completed events.
HINT: You can use Azure SignalR service to move some logic outside of your web app. From your Azure WebJob, you can use Azure SignalR REST API to broadcast messages directly to your browser clients!
It is called "Managed SignalR service". The one I use in this solution is self-hosted:
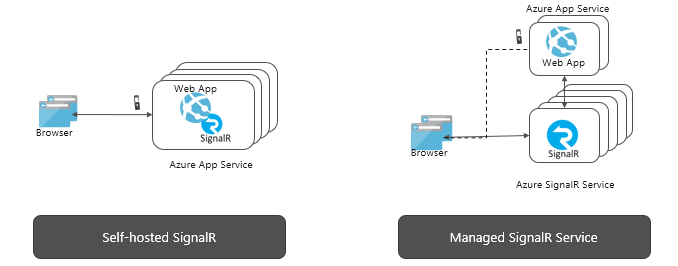
Which one is better? From my POV for this demo managed is too complicated. Managed is valid for large real-time communication-extensive applications. That's not the one we're building in this post. That's why the self-hosted approach was selected.
SharePoint Framework: Application customizer
The application customizer displays the progress of the provisioning. The key point is that we need it only during the provisioning. That's why the application customizer is deployed globally (skipFeatureDeployment = true) but doesn't contain any "features" entries inside package-solution.json. Instead, the Site Design (read further) will add and then Azure WebJob will remove custom action with Application Customizer.
Additionally, we should handle authentication against our SignalR hub using Azure AD. That's why we need to configure the "webApiPermissionRequests" node as well.
This is the process of scaffolding SharePoint Framework solution with application customizer:
- Run yo @microsoft/sharepoint
- On the question Do you want to allow the tenant admin the choice of being able to deploy the solution to all sites immediately without running any feature deployment or adding apps in sites? type Yes.
- Select Extension -> Application customizer, give it a name.
- In package-solution.json remove "features" node.
- In package-solution.json add a new node:
-
 "webApiPermissionRequests": [
      {
        "resource": "SPFx SignalR Hub",
        "scope": "user_impersonation"
      }
    ]
- Add a code that implements the loading bar component under the top placeholder.
The key thing is to perform correct authentication against your SignalR server. Fortunately, we have classes like AadTokenProvider in the SharePoint Framework core, which help with authentication. That's why the authentication is fairly simple:
// gets Azure AD JWT tokens for authentication against SignalR server
  public async getAccessToken(): Promise<string> {
    let tokenProvider = await this.props.context.aadTokenProviderFactory.getTokenProvider();
    let token = await tokenProvider.getToken(clientId);

    console.log(token);

    return token;
  }
This is the component I use to perform authentication and display provisioning state (take note of how getAccessToken is used):
spoiler (click to show)
export class SignalRHeader extends React.Component<IProps, IState> {

  constructor(props) {
    super(props);

    this.state = {
      width: 1,
      message: ''
    };
  }

  public async componentDidMount(): Promise<void> {
    let signalRHubUrl;
    if (process.env.NODE_ENV === 'dev') {
      signalRHubUrl = localHubUrl;
    } else {
      signalRHubUrl = cloudHubUrl;
    }

    let connection = new signalR.HubConnectionBuilder()
      .withUrl(signalRHubUrl, {
        accessTokenFactory: this.getAccessToken.bind(this), // authentication
        skipNegotiation: true,
        transport: HttpTransportType.WebSockets // explicitly use web sockets in order to avoid CORS issues (web sockets are not subject of CORS)
      })
      .build();

    // when "initial-state" event is triggered from server
    connection.on("initial-state", data => {
      console.log(data);

      if (data.total === -1) {
        this.setState({
          width: 100,
          message: 'Preparing the engine... The provisioning will start in a few seconds...'
        });
      } else {
        let width = data.progress / data.total * 100;
        let percent = Math.floor(width);
        this.setState({
          width,
          message: `${percent}% Provisioning: ${data.message}`
        });
      }
    });

    // when "notify" event is triggered from server
    connection.on("notify", data => {
      console.log(data);
      let width = data.progress / data.total * 100;
      let percent = Math.floor(width);

      if (width >= 100) {
        width = 99;
        percent = 99;
      }

      this.setState({
        width,
        message: `${percent}% Provisioning: ${data.message}`
      });
    });

    // when "completed" event is triggered from server
    connection.on("completed", () => {
      console.log("completed");
      this.setState({
        width: 100,
        message: `Your site is fully provisioned. Refresh the page to see the changes.`
      });
    });

    // connect
    await connection.start();

    // and ask for the initial state of the provisioning
    await connection.invoke("InitialState", this.props.webUrl);
  }

  // gets Azure AD JWT tokens for authentication against SignalR server
  public async getAccessToken(): Promise<string> {
    let tokenProvider = await this.props.context.aadTokenProviderFactory.getTokenProvider();
    let token = await tokenProvider.getToken(clientId);

    console.log(token);

    return token;
  }

  public render(): React.ReactElement {
    let divStyle = {
      width: `${this.state.width}%`
    };

    return (
      <div className="demo-preview">
        <div className="progress progress-striped active">
          <div role="progressbar progress-striped" style={divStyle} className={this.state.width === 100 ? "regular" : "progress-bar"}><span>{this.state.message}</span></div>
        </div>
      </div>
    );
  }
}
Azure WebJob
The Azure WebJob performs three main things:
- Runs PnP Provisioning Process
- Pushes progress notifications to SignalR
- Removes the application customizer at the very end of the process.
Below code is responsible for the provisioning process, as well as SignalR notifications:
private static async Task Provision(Web web, string rowKey, TextWriter log)
{
	// pushes notifications to SignalR server
	// SignalR, in turn, redirects them to all connected clients
	var notifier = new SignalRNotifier(_configReader);

	var applyingInformation = new ProvisioningTemplateApplyingInformation
	{
		ProgressDelegate = (message, progress, total) =>
		{
			log.WriteLine("{0:00}/{1:00} - {2}", progress, total, message);
			var state = new ProvisioningState
			{
				Progress = progress,
				Total = total,
				Message = message,
				PartitionKey = Consts.PartitionKey,
				Timestamp = DateTimeOffset.UtcNow,
				RowKey = rowKey
			};
			_tableManager.InsertEntity(state);

			Task.Run(async () => await notifier.NotifyProgress(state)).Wait();
		}
	};

	var provider = new XMLAzureStorageTemplateProvider(_storageConnection, "pnp-drone");

	var template = provider.GetTemplate("template.xml");
	template.Connector = new AzureStorageConnector(_storageConnection, "pnp-drone");

	web.ApplyProvisioningTemplate(template, applyingInformation);

	await notifier.NotifyCompleted();
}
As said before, client credentials flow is used in order to authenticate against SignalR using MSAL.NET:
// Azure AD cient credentials flow authentication
public async Task<string> GenerateAccessToken()
{
	var app = ConfidentialClientApplicationBuilder.Create(_configReader.AzureClientId)
		.WithClientSecret(_configReader.AzureClientSecret)
		.WithAuthority(new Uri("https://login.microsoftonline.com/" + _configReader.AzureTenantId))
		.Build();

	// generate token for itself
	var scopes = new[] { $"api://{_configReader.AzureClientId}/.default" };

	var result = await app.AcquireTokenForClient(scopes).ExecuteAsync();

	return result.AccessToken;
}
And finally the job removes the application customizer added by site design:
private static void RemoveCustomAction(Microsoft.SharePoint.Client.Site site)
{
	var customActions = site.GetCustomActions().Where(a => a.Title == Consts.CustomActionName).ToList();
	var length = customActions.Count;
	for (int i = 0; i < length; i++)
	{
		customActions[i].DeleteObject();
	}

	site.Context.ExecuteQueryRetry();
}
Site script and site design
Add a new site script to your tenant, with an action called "triggerFlow" (you can have many actions, for this demo I use only one). Despite the name, it works with Logic Apps, because it's the same technology.
The second action is the Application customizer site association. Remember - this is a task for a WebJob to remove this application customizer. clientSideComponentId is the Id from your PnPNotifierHeaderApplicationCustomizer.manifest.json file.
This is your PowerShell code to add a new site script (PowerShell cmdlets to manage site scripts and site designs for your reference):
$site_script = @'
{
    "$schema": "schema.json",
    "actions": [
		{
				"verb": "triggerFlow",
				"url": "<Logic App trigger url>",
				"name": "Apply PnP Template",
				"parameters": {
					"event":"",
					"product":""
				}
		},
		{
			"verb": "associateExtension",
			"title": "PnP Notifier",
			"location": "ClientSideExtension.ApplicationCustomizer",
			"clientSideComponentId": "260b5bdc-c542-4f9f-868e-bb9d2cd4bc45",
			"scope": "Site"
		}
    ],
    "bindata": {},
    "version": 1
}
'@

Add-SPOSiteScript -Title "Trigger Drone template provisioning" -Content $site_script -Description "Applies drone communication site template via azure web job"

#Set-SPOSiteScript -Identity 3814fab2-a4ed-4d82-b884-5926c5b17c19 -Content $site_script -Version 3
You should update the url with the one saved from the Logic app step.
Site design command is quite simple:
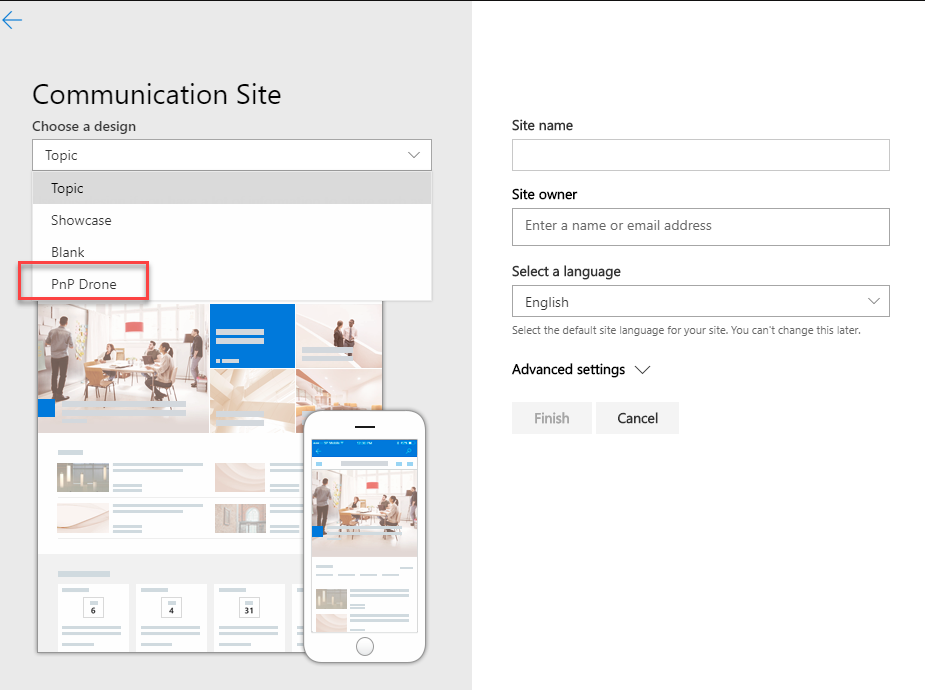
Add-SPOSiteDesign -Title "PnP Drone" -WebTemplate "68" -SiteScripts "<id of site script>" -Description "Drone site template for communication site"
Here you should provide the site script ID added earlier.
As a result, you will see a new option under site creation dialog:
What's next?
Someone might say that today anybody can be a SharePoint developer with React skills. Well, you see it's not always true. For real-life solutions you still should know a lot about SharePoint itself and related technologies like ASP.NET, Azure, etc.
Here we saw how different things might be connected to build a solution:
- SharePoint Site Designs and Site Scripts
- Azure Logic App (or Power Automate aka MS Flow)
- Azure AD with different authentication scenarios
- Azure WebJobs (or Functions)
- ASP.NET web app with SignalR
- Azure storage
- SharePoint Framework and well, finally React
References, additional reading
SharePoint site design and site script overview
Calling Microsoft Flow from a site script
Calling the PnP provisioning engine from a site script
Connect to API secured with Azure Active Directory
Real-time ASP.NET with SignalR
Azure SignalR Service
P.S. This post is my small personal record by the amount of time I spent on all the preparations (the demo project, the post itself, the video) and by the word count. I hope you enjoyed it 😊
Title image credits - FreeVector.com