Building Single Page Application with React, MSAL.js and PnPjs
A month ago (May 2019) Microsoft Authentication Libraries (aka MSAL) for .NET and JavaScript went GA. If you haven’t heard or used MSAL before it’s a good time to try it.
Ok, what is all this stuff is about?
A few theory here. Let’s imagine you have a need to authenticate a user against organizational Azure AD. Most likely you will start looking at Azure Active Directory Authentication Libraries (aka ADAL). They help you to authenticate your application against Azure Active Directory. Under the hood, they use V1.0 Azure Active Directory endpoints for authentication. This approach is pretty old (and proven) if you have a need to authenticate work (for example Office 365) or school accounts.
What about personal accounts and social networks? It’s possible to implement such authentication in your app using V2.0 endpoints. These V2.0 endpoints also called Microsoft identity platform. For new applications, it’s recommended to use Microsoft identity platform. However, there are some limitations you should be aware of before starting a new application.
v1.0 VS v2.0 (Azure Active Directory Authentication VS Microsoft identity platform)
The main differences are:
- v2.0 adds personal accounts and social login (via Azure AD B2C)
- v2.0 supports dynamic permissions (request permissions “on the fly”)
- v2.0 uses a “scope” notion instead of a resource like in v1.0
For the full list of differences as well as some limitation of v2.0 I really encourage you to read this article - Why update to Microsoft identity platform (v2.0)?
ADAL vs MSAL
Now it should become clear what is MSAL. While ADAL libraries work with v1.0 endpoints (Azure Active Directory), MSAL work with v2.0 (Microsoft identity platform). Both provide libraries for convenient authentication and token generation. However, MSAL went GA only a month ago as stated at the beginning.
Building the app
In this post, I’m going to build a SPA with react, PnPjs and MSAL.js as authentication library. Additional interesting reading here - Differences between MSAL JS and ADAL JS.
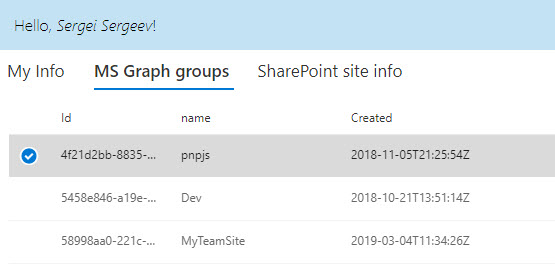
The app reads information about the current user, SharePoint web site and all Azure AD groups available at a tenant and displays information in tabs. This is how it looks like when running:
The source code for the post is available here at GitHub.
App registration
For app registration, I recommend using the Azure Portal experience. New App registration UI is available in Azure Portal, use it for new app registration:

Enable Implicit Flow for new app registration
Go to Manifest view and update oauth2AllowIdTokenImplicitFlow and oauth2AllowImplicitFlow - set to true.
Add permissions to the app registration
v2.0 allows dynamic permissions, but in my sample, I added some static permissions upfront:
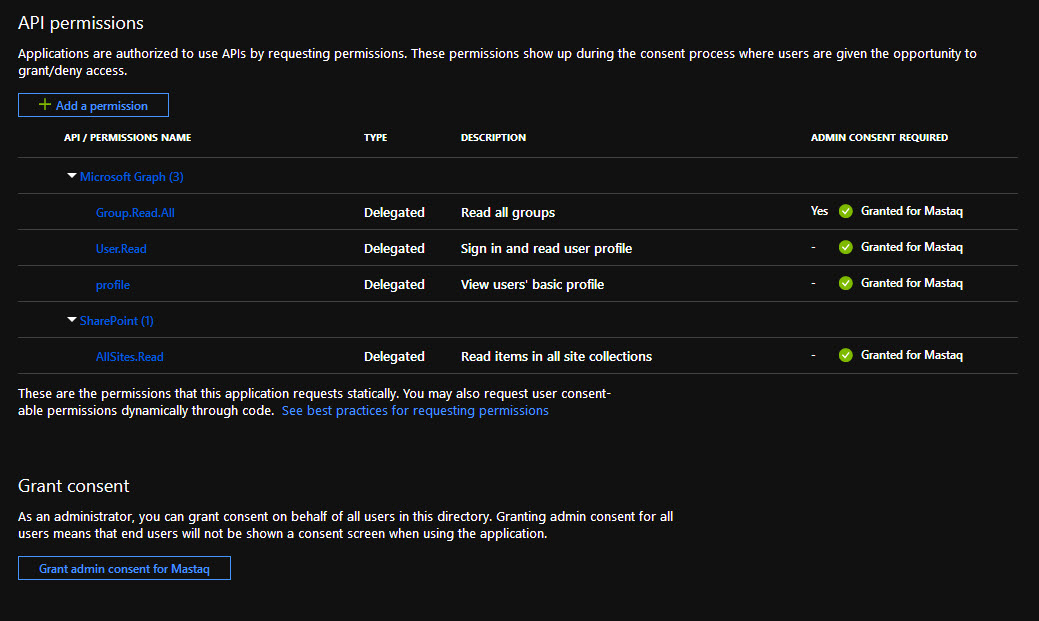
I enabled the following permissions:
- for MS Graph: User.Read, Group.Read.All, profile;
- for SharePoint: AllSites.Read
Create react project
Scaffold a react project using create-react-app or any other starter template. I use this one which I found very powerful and customizable (yes I prefer to see webpack configs in my sources :)). Install msal and PnPjs dependencies:
npm install msal @pnp/common @pnp/graph @pnp/logging @pnp/odata @pnp/sp --saveAdd a new variable to store msal authentication details. We need ClientId of our app registration and tenant id:
export const msalConfig = {
  authority: 'https://login.microsoftonline.com/d2a410c1-dc63-444f-99b4-1a943e8c8d1d',
  clientId: '917cd047-d05d-4686-aff9-999bb486202a'
};
Build authentication high-order-component
Now we need to handle authentication somehow. A good option is to use react’s high-order-components and create a component which handles all authentication. Then simply wrap your main app component with authentication and that’s it!
This is our state to manage authentication states:
this.state = {
        authenticated: false,
        renewIframe: false,
        hasError: false,
        errorMessage: null
      };
I use the componentWillMount event to check the authentication state and perform the required actions. For that purpose, I use msal.js API. Check out the official repository to see how to use it. There are some samples also available.
First of all, we need an instance of msal’s application:
export const msalInstance = new UserAgentApplication({
  auth: msalConfig
});
Msal.js supports two methods of authentication - using popups or full page redirects. You decide what is preferred for you, I use full page redirects.
Here is the full code of componentWillMount:
public componentWillMount(): void {

      // action to perform on authentication
      msalInstance.handleRedirectCallback(() => { // on success
        this.setState({
          authenticated: true
        });

        this.initPnPjs();
      }, (authErr: AuthError, accountState: string) => {  // on fail
        console.log(authErr);

        this.setState({
          hasError: true,
          errorMessage: authErr.errorMessage
        });
      });

      // if we are inside renewal callback (hash contains access token), do nothing
      if (msalInstance.isCallback(window.location.hash)) {
        this.setState({
          renewIframe: true
        });
        return;
      }

      // not logged in, perform full page redirect
      if (!msalInstance.getAccount()) {
        msalInstance.loginRedirect({});
        return;
      } else {     // logged in, set authenticated state and init pnpjs library
        this.setState({
          authenticated: true
        });
        this.initPnPjs();
      }
    }
We set up redirect handler and set authenticated: true on successful authentication. The last important step is to initialize PnPjs library. This is done in initPnPjs method:
private initPnPjs(): void {
      const fetchClientFactory = () => {
        return new PnPFetchClient(msalInstance);
      };

      sp.setup({
        sp: {
          fetchClientFactory,
          baseUrl: process.env.SP_SITE_URL
        }
      });

      graph.setup({
        graph: {
          fetchClientFactory
        }
      });
    }
Custom fetchClientFactory is another important component here. This class is responsible for access token generation. It derives from PnPjs BearerTokenFetchClient class and adds methods to request access tokens using msal.js.
You should override one method fetch from the base class:
  public async fetch(url: string, options: FetchOptions = {}): Promise<Response> {
    if (!isUrlAbsolute(url)) {
      throw new Error('You must supply absolute urls to PnPFetchClient.fetch.');
    }

    const token = await this.getToken(this.getResource(url));
    this.token = token;
    return super.fetch(url, options);
  }
And finally, the most interesting method is getToken. It uses msal.js API to get an access token. An important point here is that v2.0 endpoints allow you to request permissions dynamically. Additionally, v2.0 endpoints use scopes instead of resources. That’s why we should handle a situation when user interaction required and login user again to consent additional permissions:
private async getToken(resource: string): Promise<string> {

    const request: AuthenticationParameters = {
    };

    if (resource.indexOf('sharepoint') !== -1) {
      request.scopes = [`${resource}/AllSites.Read`];
    } else if (resource.indexOf('graph') !== -1) {
      request.scopes = [`${resource}/Group.Read.All`, `${resource}/User.Read`, `${resource}/profile`]
    }

    try {
      const response = await this.authContext.acquireTokenSilent(request);

      return response.accessToken;
    } catch (error) {
      if (this.requiresInteraction(error.errorCode)) {
        this.authContext.acquireTokenRedirect(request);
      } else {
        throw error;
      }
    }
  }
Conclusion
This is the bare minimum you need to make msal.js to work with PnPjs in React SPA. One thing to keep in mind. If you want to use dynamic scopes for MS Graph in your application with PnPjs, then you should take care of dynamic consent on your own. PnPjs knows nothing about scopes, which scopes were consented and which were not. It adds a bit of complexity in your app, but user convenience often goes with complexity in your code.
The source code is available here at GitHub.